If you want to edit List Item default forms on UI then there is another way...
Just add below line in URL..
&ToolPaneView=2
After adding this statement in URL, you can edit page or add new web parts on default list items page.
&ToolPaneView=2
<asp:DropDownList ID="ddlCategory" runat="server" > </asp:DropDownList>
public void PopulateDocNames()
{
    ArrayList listWithMyCT = new ArrayList();
    using (SPSite objSite = new SPSite("http://YOURSITE:PORT/"))
    {
        using (SPWeb objWeb = objSite.OpenWeb())
        {
            foreach (SPList list in objWeb.Lists)
            {
                if (list is SPDocumentLibrary && list.ContentTypes["Custom_Content_Type"]!= null)
                {
                    listWithMyCT.Add(list.Title);
                }
            }
        }
    }
    ddlCategory.DataSource = listWithMyCT;
    ddlCategory.DataBind();
}
|
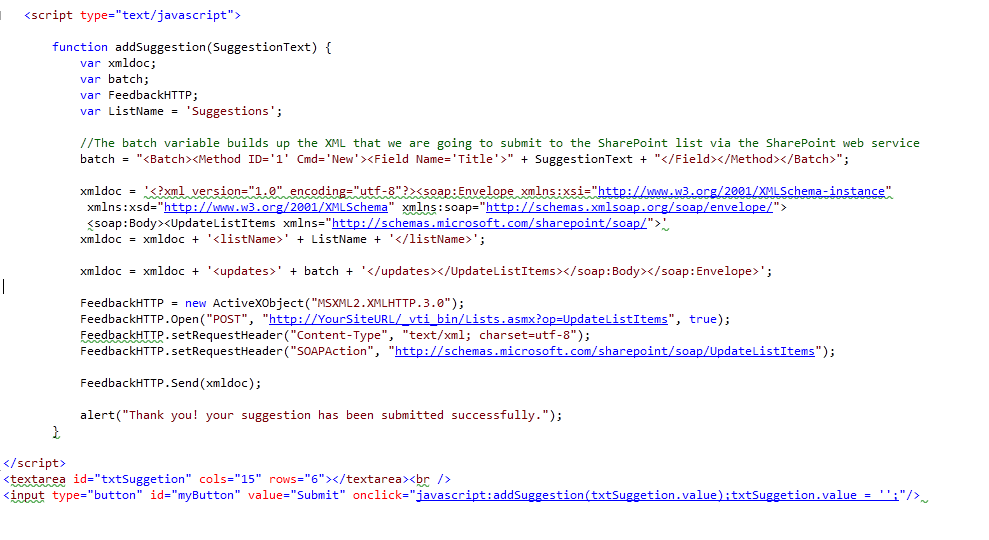
<script type="text/javascript">
function
addSuggestion(SuggestionText) {
var xmldoc;
var batch;
var FeedbackHTTP;
var ListName = 'Suggestions';
//The batch variable builds up the XML that we are going
to submit to the SharePoint list via the SharePoint web service
batch = "<batch><method id="'1'"
cmd="'New'"><field name="'Title'">" + SuggestionText + "</field></method></batch>";
xmldoc = '<?xml version="1.0"
encoding="utf-8"?><soap:envelope
xsi="http://www.w3.org/2001/XMLSchema-instance"
xsd="http://www.w3.org/2001/XMLSchema"
soap="http://schemas.xmlsoap.org/soap/envelope/"><soap:body><updatelistitems
xmlns="http://schemas.microsoft.com/sharepoint/soap/">'
xmldoc =
xmldoc + '<listname>' + ListName + '</listname>';
xmldoc =
xmldoc + '<updates>' + batch + '</updates></updatelistitems></soap:Body></soap:Envelope>';
FeedbackHTTP = new ActiveXObject("MSXML2.XMLHTTP.3.0");
FeedbackHTTP.Open("POST", "http://YourSiteURL/_vti_bin/Lists.asmx?op=UpdateListItems", true);
FeedbackHTTP.setRequestHeader("Content-Type", "text/xml;
charset=utf-8");
FeedbackHTTP.setRequestHeader("SOAPAction", "http://schemas.microsoft.com/sharepoint/soap/UpdateListItems");
FeedbackHTTP.Send(xmldoc);
alert("Thank you! your suggestion has been submitted
successfully.");
}
</script>
<textarea cols="15" id="txtSuggetion" rows="6"></textarea>
<input id="myButton" onclick="javascript:addSuggestion(txtSuggetion.value);txtSuggetion.value
= '';" type="button" value="Submit" />
|
Today I worked on small task; I need to implement “All Sites” option in search control drop downbox. By default it’s not available in search control dropdown.
Follow simple steps to add “All Sites” option in Sharepoint Search control:
1. Goto root site and click on Site Setting
2. Click on ‘Search Settings’ from Site Collection Administration section
3. Second radio button option is selected for first time with name as ‘Do not use custom scopes. Display results in the search results page (/_layouts/osssearchresults.aspx).’ This option is for “This Site:” option
4. First radio button option is “Use custom scopes. Display richer results using the following Search Center:” This option is for custom drop down items like "All sites" and “people” options.
5. So to display “All Sites” option, we need to have “Search Center” team site. This Search Center team site is automatically created within enterprise sharepoint edition; but if you don’t have enterprise version then you need to create Search Center site
6. So create new team site by going to root site, select Site Actions -> Create Site , give search site name, URL name like e.g. Search, and select template as Click on Enterprise tab and click on ‘Search Center With Tabs’ option. Next click on Create button. It will create new Search Center site.
7. Once you create this site, copy URL of search site and paste into first radio option text box (as explained in step 4) in search setting option. (e.g. /Search/Pages), click on OK button
8. After that it will give new extra options “All sites” and “People” in search dropdown control.
Search anything with “All sites” option, it will return result in http://[your_site_name]/_layouts/osssearchresults.aspx page.
.
 in this progress control use forground = "Red" but in this control this color look very lighter than original. So what to do if we want to use original solid html colors?
<Grid x:Name="LayoutRoot">
<TextBlock Loaded="StartTimer" x:Name="myTextBlock" />
Grid>
Right click on "StartTimer" and select 'Navigate to Event Handler', it will create new event handler method in .cs file. Add following code in xmal.cs file:private void StartTimer(object sender, RoutedEventArgs e)
{
System.Windows.Threading.DispatcherTimer newDispatcherTimer = new System.Windows.Threading.DispatcherTimer();
newDispatcherTimer.Interval = new TimeSpan(0, 0, 0, 0, 1000); // for 1 seconds
newDispatcherTimer.Tick += new EventHandler(Every_Seconds);
newDispatcherTimer.Start();
}
int iCounter = 0;
// Retrive after every 1000 millseconds(1seconds) while the DispatcherTimer is active.
public void Every_Seconds(object o, EventArgs sender)
{
myTextBlock.Text = "Second Counter : " + (iCounter++).ToString();
}