SharePointAds TextOnly

Thursday 15 December 2011

How to create Calendar recurring event from SharePoint Designer 2010 workflow?


Do you want to create new calendar recurring event from SharePoint workflow? If yes, then you are at correct place.
You can easily create simple calendar event (which doesn’t have recurring properties/values), Some days before I was trying to create new recurring event from SPD workflow using “Create Item” action, and found that we can’t create recurring event from SPD workflows because when we’re trying to add new calendar list item from ‘Create Item’ OOB workflow action, at that point we can’t assign the recurring rules values to ‘Recurrence’ column and there is not any available way to pass recurrence rule xml values.
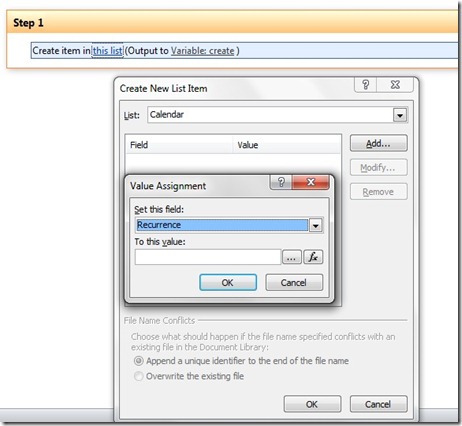
SPD_WF
I found an interesting article which creates new calendar event with recurring parameters programatically(http://msdn.microsoft.com/en-us/library/ms434156.aspx). But I was looking to create calendar events from SPD workflows and I decided to create workflow custom action to insert new recurring events. If you don’t know how to create custom action for SPD workflows then look at here (http://msdn.microsoft.com/en-us/office365trainingcourse_lab_3_2_topic3#_Toc290553044), this is very simple and easier solution to create custom custom actions from VS. You just have to make following changes,
  1. Add new class file to the solution for recurring event action (I created as “CreateCalendarRecurrenceEvent.cs”)
  2. Your ‘Element.xml’ file would be as following,  

    <?xml version="1.0" encoding="utf-8"?>

    <Elements xmlns="http://schemas.microsoft.com/sharepoint/">

      <WorkflowActions>

        <Action Name="Create Recurring Event"

                SandboxedFunction="true"

                Assembly="$SharePoint.Project.AssemblyFullName$"

                ClassName="SPDRecurringEventAction.CreateCalendarRecurrenceEvent"

                FunctionName="CalendarRecurrenceEvent"

                AppliesTo="all"

                Category="My Custom Workflow Activities">


          <RuleDesigner Sentence="Create New calendar recurring event with title : %1 and rule: %2 (Exception to %3)">

            <FieldBind Id="1" Field="eventTitle" Text="Event Name" DesignerType="TextBox" />

            <FieldBind Id="2"  Field="recurrenceRule" Text="Recurrence Rule" DesignerType="TextBox" />

            <FieldBind Id="3" Field="Except" Text="Exception" DesignerType="ParameterNames" />

          </RuleDesigner>


          <Parameters>

            <Parameter Name="__Context"

                       Type="Microsoft.SharePoint.WorkflowActions.WorkflowContext, Microsoft.SharePoint.WorkflowActions"

                       Direction="In" DesignerType="Hide"/>


            <Parameter Name="eventTitle" Type="System.String, mscorlib" Direction="In"

                       DesignerType="TextBox" Description="Event Name" />


            <Parameter Name="recurrenceRule" Type="System.String, mscorlib" Direction="In"

                       DesignerType="TextBox" Description="Recurrence Rule" />


            <Parameter Name="Except" Type="System.String, mscorlib" Direction="Out"

                       DesignerType="ParameterNames" Description="Exception encountered"/>

          </Parameters>

        </Action>


      </WorkflowActions>

    </Elements>


  3. In your new class add following method to create new recurring event.
class CreateCalendarRecurrenceEvent

    {

        public Hashtable CalendarRecurrenceEvent(SPUserCodeWorkflowContext context, 
string eventTitle, string recurrenceRule)

        {

            Hashtable results = new Hashtable();

            int iYear = 0, iMonth = 0, iDay = 0;

            results["Except"] = string.Empty;

            try

            {

                using (SPSite site = new SPSite(context.CurrentWebUrl))

                {

                    using (SPWeb web = site.OpenWeb())

                    {


                        iYear = DateTime.Now.Year; iMonth = DateTime.Now.Month; iDay = DateTime.Now.Day;

                        DateTime startTime = new DateTime(iYear, iMonth, iDay, 8, 0, 0); //

                        DateTime endTime = startTime.AddHours(6);


                        SPList cal = web.Lists["Calendar"];

                        SPListItem calEvent = cal.Items.Add();

                        calEvent["Title"] = eventTitle;

                        calEvent["RecurrenceData"] = recurrenceRule;

                        calEvent["EventType"] = 1;

                        calEvent["EventDate"] = startTime;

                        calEvent["EndDate"] = endTime;

                        calEvent["UID"] = System.Guid.NewGuid();

                        calEvent["Recurrence"] = 1;
                        calEvent.Update();

                    }

                }

            }

            catch (Exception ex)

            {

                results["Except"] = ex.ToString();

            }

            return results;

        }

    }


(NOTE: I have used default calendar list to create new recurring event, if you want to create recurring event in another calendar list then change 'Calendar' list name.
)
Build and deploy action and follow the steps given at  http://msdn.microsoft.com/en-us/office365trainingcourse_lab_3_2_topic3#_Toc290553044

In SharePoint Designer workflow, add your custom activity, assign Name and Recurrence Rule pattern as in XML format. You can check more recurrence patterns from Here.
(NOTE :  Rule value must be in single line text, I have used as " <recurrence><rule><firstDayOfWeek>su</firstDayOfWeek><repeat><daily dayFrequency='2' /></repeat><windowEnd>2011-12-30T09:00:00Z</windowEnd></rule></recurrence>
  ")


I have created SPD custom activity solution on Codeplex, you can download actual project solution from here (http://spdcustomaction.codeplex.com/releases/view/78835)

Enjoy custom activity to create new recurring events from SharePoint Designer workflow.


Wednesday 16 November 2011

SharePoint online SUBSITE authentication using client object model :

Are you looking for the perfect solution to authenticate and get data from SharePoint online subsite 2010 (SPO) using client object model?
You can find following sample projects to connect authenticate SharePoint online site content using client object model,
This article has given brief overview of claims-based authentication and client object model for remote authentication in SharePoint Online. You can download sample code which demonstrates technique of adding SharePoint authentication cookies to the ClientContext object. Solution prompted a dialog window where user have to enter their Office 365 credentials, use the same cookies to the SharePoint client side object model (CSOM) to get SharePoint site content.

But what should I do when I don’t want to show prompt form to enter user details, because I am accessing sharepoint content in Azure site. So I started to check the solution where I can provide user credentials from the code.

This sample queries the Office 365 STS directly using the Windows Identity Foundation (WIF).  WIF helps with managing the security tokens and requests to the STS. 

Great! This is what exactly I was looking for, it is very good solution.
Project executable solution works fine with the root site. I was trying to query for SharePoint online subsite using the same code but giving (404) NOT Found error for Subsites. When I debugged the code, found following line

Wreply = samlUri.GetLeftPart(UriPartial.Authority) + "/_forms/default.aspx?wa=wsignin1.0"

For root site it gets the correct reference like https://site/_forms/default.aspx?wa=wsignin1.0 and if you used same code to query SharePoint subsite it will give you (404) Not Found because if you try to browse https://site/subsite/_forms/default.aspx?wa=wsignin1.0  browser will show 404 not found error.

Conclusion:
Make following changes on ‘MsOnlineClaimsHelper.cs’ file,
-          Find following line in CS file,
Wreply = _samlUrl  + "/_forms/default.aspx?wa=wsignin1.0"

-          Update same file with following changes

Uri samlUri  = new Uri(_samlUrl);
var sharepointSite = new
         {
                Wctx = office365Login,
                Wreply = samlUri.GetLeftPart(UriPartial.Authority) + "/_forms/default.aspx?wa=wsignin1.0"
         };

                Above changes works for me! Let me know if you want any more information.

Monday 27 June 2011

SharePoint 2010 : Print Calendar list on a single click

Do you want to print SharePoint 2010 list at a single click?
Yes, now you can print your SharePoint 2010 list in single click using SPPrintListButton solution.
I have provided Sandbox solution which will add new "Print" button on the top ribbon for SharePoint List. As of now I have created for Calendar lists.
Print List Button


Please have a look at my codeplex solution to download and install feature in your SharePoint 2010 list.
CodePlex Solution: Download From CodePlex

Important Update:  After lots of print button image view error requests, updated solution to work with subsites calendar lists. Please visit at same CodePlex page to download updated version.
And let me know if you get previous error again.
.

Thursday 9 June 2011

SharePoint 2010 : how to open Modal Dialog in ECB Menu

You can open model dialog in SharePoint site using the following code:

<script type="text/javascript">
function openDialog() {
     var options = {
          url: "demopage.aspx"
         width: 600,
         height: 300,
         title: "My PopUp",
     };
     SP.UI.ModalDialog.showModalDialog(options);
 }

</script>
<div>
    <a  onclick="javascript:openDialog(); return false;">Click Herea>
    <asp:Button ID="btnDialog" runat="server" Text="Open Dialog"  OnClientClick="javascript:openDialog(); return false;"/>
</div>

But what if you want to open dialog from ECB menu? Create new custom action in Element.xml file and in UrlAction tag use the following javascript function.

<Elements xmlns="http://schemas.microsoft.com/sharepoint/"
    <CustomAction
        Id="{B0B5A0CB-7FBE-4dd6-9B2A-2B1E1321B8F9}"
        RegistrationType="List"
        RegistrationId="101"
        Location="EditControlBlock"
        Title="Goto My Blog">     
        <UrlAction Url="javascript: function onClose(){ }
          var o = {
            url: 'http://www.niteen.co.cc',
            title: 'MyBlog',
            allowMaximize: true,
            showClose: true,
            width: 700,
            height: 500,
            dialogReturnValueCallback: onClose
          };
          SP.UI.ModalDialog.showModalDialog(o);"/>
    </CustomAction
</Elements>

In above code, I created new ECB menu for “Document library”, you can create ECB menu for any lists by changing RegistrationId , you can find all required Register Id here.
If you are not able to see modal dialog then change the <UrlAction> tag with following function.

<UrlAction Url="javascript:(function () {
        var o = {
        url:'http://www.niteen.co.cc',
        title: 'MyBlog',
        allowMaximize: true,
        showClose: true,
        width: 700,
        height: 500
        };
        SP.UI.ModalDialog.showModalDialog(o); }) ();"/>


Wednesday 23 February 2011

How to resolve "The language-neutral solution package was not found" error?


Many of developers faced with this error while deploying SharePoint solution from Visual Studio.
I tried many different ways to solve this error like


Delete the following folders from the project directory(In Visual Studio, Right click on project in "solution explorer" window and select 'Open folder in Windows Explorer' ;) )

  • bin
  • obj
  • pkg

and then IISRESET (Goto start > Run > and write IISRESET and press ENTER ) 


Sometimes it works but not every time, So what is the another solution to remove this error while deploying?


Here is simple tric to resolve this problem.. :)
Just open powershell (or Sharepoint management shell) and execute following command,
(get-spsolution YourSolution.wsp).Delete()


that's it.. now you can deploy solution without getting "The language-neutral solution package was not found" error.
*Note: Change "YourSolution.wsp" name to your WSP file name.

Saturday 29 January 2011

Change Sharepoint site home page to Sub-site page

Sharepoint 2010 has given top ribbon from where you can change any sharepoint page as home page for current site by "Make this page as Home page"


But there is one limitation, you cannot assign sub site pages as top site home page.

Then how could you do this change? Is there any way to change default home page to the sub-site pages? Even you cannot change default home page from IIS.

I googled for this and found another way to change default home page path. You have to change into web.config file of Sharepoint site(you can find web.config by looking at Local_Drive:\Inetpub\wwwroot\port_number or check this blog for more details http://blog-sharepoint.blogspot.com/2009/12/where-is-sharepoint-webconfig.html )

Edit your site web.config file with following lines (under system.web )

<urlMappings enabled="true">

<add url="~/" mappedUrl="/french/Pages/Default.aspx"/>

</urlMappings>


Save above changes to web.config file and reset IIS. And now browse for the site, you will see the changes.

you can change default home page in both Sharepoint 2010 and MOSS 2007.