When you assign workflow task to any group and how would you get task approvers user name? Task list can show only 'assigned to' column which will give you group name only. You can fetch approvers user name by creating custom List item event receiver for task list. Create Item updated event receiver and add following code...
public override void ItemUpdated(SPItemEventProperties properties) { base.ItemUpdated(properties);
If You have to modify user profile information from 'People and Groups' option in Sharepoint site then you can't directly edit user profile information. Even on edit user page you will see only non editable data.
User profile information can be change from 2010 central administration site. Follow the steps to modify user profile or user properties.
Login Central Admin site
Click on 'Application Management' option menu from left navigation
In 'Service Application' section, click on 'Manage service applications' link
From this serviceappliction page, click on 'User Profile Service Application' link
And then you can see lots of options for people, synchronization, Organizations, My site settings etc etc,
On same page, under People section click on 'Manage User Profiles' link
find the user and click on User name from below grid, select 'Edit My Profile' option
You can change user profile on edit form.
Click on 'Save and close' button
By default it could take up to some time to reflect the new updated information througout all web applications bound to the user profile service application. A timer job is taking care of this and you could kick this one of to run manually once by going to "Check Job Status" screen in Central Admin (http://site/_admin/Timer.aspx).
How we can edit Sharepoint's List Item forms( NewForm.aspx, DispForm.aspx or EditForm.aspx) from UI? By default there is not any option in Site Setting tab to edit form. If you want to edit List Item default forms on UI then there is another way... Just add below line in URL..
&ToolPaneView=2
After adding this statement in URL, you can edit page or add new web parts on default list items page.
You can remove 'All Site Content' and ‘Recycle Bin’ link from sharepoint site by doing some change in master pages. Follow the following steps to remove both links from every pages.
Open ‘v4.master’ file from C:\Program Files\Common Files\Microsoft Shared\Web Server Extensions\14\TEMPLATE\GLOBAL (If you have only MOSS then in \12\TEMPLATE\GLOBAL ) or If you are using your custom master page then edit your custom master page.
Find </head> , above </head> add following code
Save the changes in file. Now it will affect on every
We can store insert items in Sharepoint items using many ways like using Sharepoint object model etc. But I need to insert items with Javascript.
I googled lot but didn't get any useful infomation, only Jan tielens' Blog has some infomation which showing list data on page using jQuery.
Finally I created the solution which stores the text box value in the Sharepoint list on button click. Following steps will show step by step information.
Create the blank web part page in your sharepoint site.
Browse this web part page
Edit page by clicking on site action -> Edit page
In any web part zone, click on 'Add a web part' then add 'Form Web part', Modify this web part.
Click on source editor button, it will open new window to add your content.
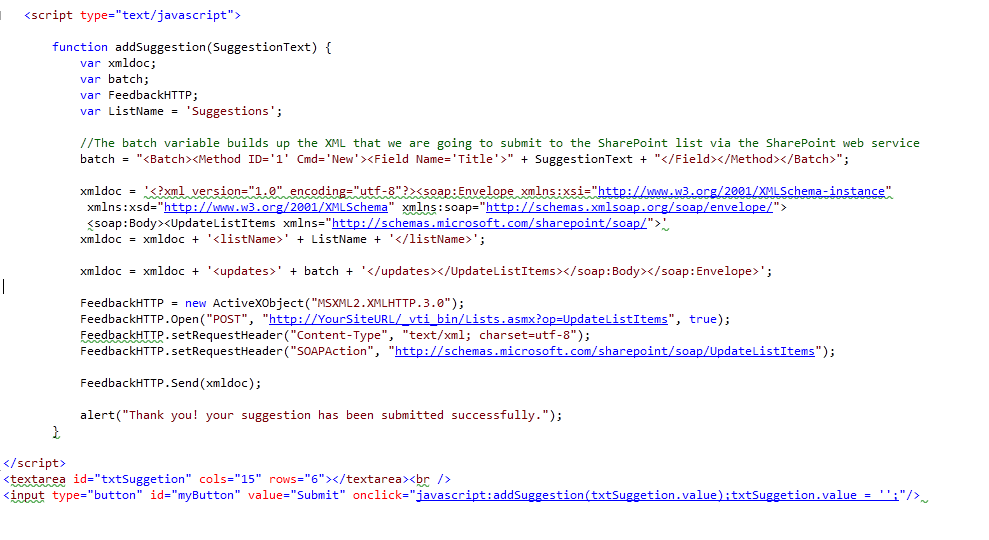
I added a HTML textarea and button with simple javascript which will store textarea value in given sharepoint list.
(Before that create new custom list with any name as you wish. I created with name 'Suggestions'
On source editor, copy and paste following code
<scripttype="text/javascript">
function
addSuggestion(SuggestionText) {
var xmldoc;
var batch;
var FeedbackHTTP;
var ListName = 'Suggestions';
//The batch variable builds up the XML that we are going
to submit to the SharePoint list via the SharePoint web service
Today I worked on small task; I need to implement “All Sites” option in search control drop downbox. By default it’s not available in search control dropdown.
Follow simple steps to add “All Sites” option in Sharepoint Search control:
1.Goto root site and click on Site Setting
2.Click on ‘Search Settings’ from Site Collection Administration section
3.Second radio button option is selected for first time with name as ‘Do not use custom scopes. Display results in the search results page (/_layouts/osssearchresults.aspx).’ This option is for “This Site:” option
4.First radio button option is “Use custom scopes. Display richer results using the following Search Center:” This option is for custom drop down items like "All sites" and “people” options.
5.So to display “All Sites” option, we need to have “Search Center” team site. This Search Center team site is automatically created within enterprise sharepoint edition; but if you don’t have enterprise version then you need to create Search Center site
6.So create new team site by going to root site, select Site Actions -> Create Site , give search site name, URL name like e.g. Search, and select template as Click on Enterprise tab and click on ‘Search Center With Tabs’ option. Next click on Create button. It will create new Search Center site.
7.Once you create this site, copy URL of search site and paste into first radio option text box (as explained in step 4) in search setting option. (e.g. /Search/Pages), click on OK button
8.After that it will give new extra options “All sites” and “People” in search dropdown control.
Search anything with “All sites” option, it will return result in http://[your_site_name]/_layouts/osssearchresults.aspx page.